
Plug me up
This article is © 2019 [email protected] and may not be reproduced without written consent.
This is part two of an in-depth three part article:
- Part One “Got Protection” explains why motorcyclists need hearing protection and covers important sound concepts used in parts two and three
- Part Two “Plug me up” addresses the types of hearing protection standards and how to correctly fit and maintain earplugs
- Part Three “Got Protection – The Data“ is a detailed and comparative review of thirty-four different earplugs
If you’re looking for a summary: as a motorcyclist wear high protection earplugs. To know why and which ones to use, read on but please read each article in order as they build on each other.
TYPES OF PLUGS
Disposable foam earplugs are “rolled down” into a cylinder to subsequently expand and seal your ear canal. Reusable earplugs are often made with one or more flanges that hold them in your ear canal. Both disposable foam and reusable plugs come in corded and uncorded variants. Cords can create additional induction related noise as wind rushes over the partially exposed cord, for these I recommend pushing any exposed cord up into the rear of your lid to reduce this extra noise.
Custom earplugs are just that: specifically made to fit your ears which saves the time spent rolling, inserting and waiting for foam plugs to expand and importantly getting them deep enough into your ear canal to be effective – incorrect fitting of disposable foam plugs can make them close to useless – with custom plugs you’ll easily know as they simply won’t fit flush with your ears. On that last point, there are two types of custom plugs: ear canal only or full conch (the harder cartilage part of your ear). With full conch plugs it’s easy to tell if they’re inserted in your ear canals properly, they may offer slightly more hearing protection than ear canal only custom plugs, it’s easier to handle their larger size and they are less likely to dislodge when jiggling your lid around to fix up folded over ears (oh, the perils of motorcycling!).
Custom plugs can be made from a soft silicon type material through to full silicon. These come in two flavours: an impression is made of your ear conch/ear canal then sent off to a specialist to mould into silicon plugs or a DIY/audiologist/Superbike/MotoGP stall takes an impression with no intervening moulding (you still have to wait for them to harden and then be coated with a protective material).
Knowing how much protection you’ll get from a custom plug is very difficult to measure and the plugs will be affected by any weight loss or gain and by jaw movements.
THE RIGHT FIT
Getting the right fit is crucial. One study shows that from a 33 dB noise reduction rated (NRR, defined below) set of plugs, incorrect fitting can reduce the NRR down to zero dB (!).
For roll down disposables “ROLL -> PULL -> HOLD”
- With clean hands roll the plug into the narrowest possible crease free cylinder
- Open your ear canal by pulling the tip of your ear upward and outward
- Insert the plug into your ear as quickly as possible and hold it in until it expands, depending on the type of plug anywhere from 11 seconds through to several minutes (seriously!)
Typically plugs like to expand as soon as you’ve rolled them so hold them tightly between your fingers on one hand while pulling your ear and insert the plug quickly so that you get a good fit. How far should you stick it in? (I can hear the sniggers from the back row from here) Suffice to say that you should use your judgement and instructions etc. Personally I stick them in as far as I can, and it makes a big difference (to me). Your mileage will vary, I’m not a trained health care professional and I’m not here to provide you with medical advice. Objects in mirror are closer than they appear etc etc.
For reusables and custom plugs I’ve found that twisting while inserting gives a good fit. With reusables though they can end up a long way into your ear canal and be somewhat tricky to remove.
PROTECTION RATINGS
What Rating? This is where it gets a bit messy. A great teacher once said that “the nice thing about standards is that you have so many to choose from”, the same applies to hearing protection. There are three main standards:
SNR (Single Number Rating) a European standard which is an average of attenuation (reduction) across a defined set of frequencies.
NRR (Noise Reduction Rating) an American standard which also measures a range of noise reduction across set frequencies.
SLC80 (Sound Level Conversion) an Australian/New Zealand standard which is a value determined by 80% of the test subjects’ measured sound pressure between the external sound and that inside the ear canal.
Class is aligned to the SLC80 standard and simplifies selecting a hearing protector, the range of classes is
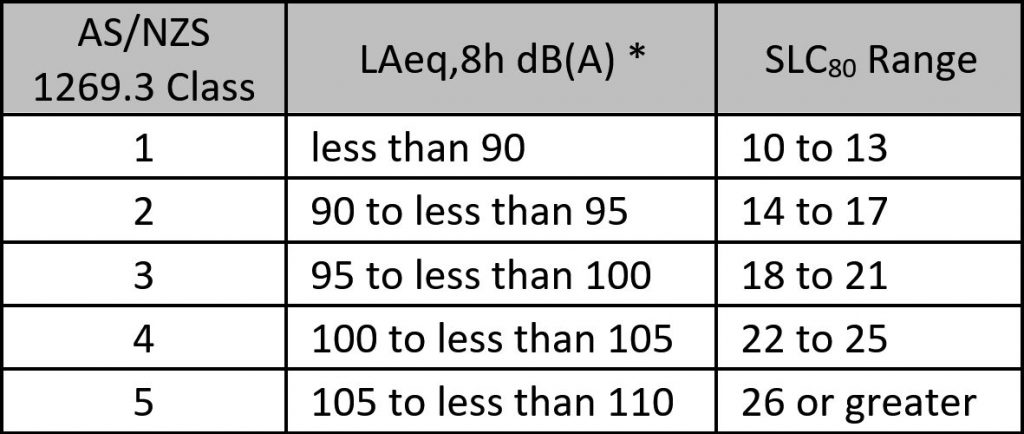
* average sound exposure over eight hours
Now that we have plenty of different standards to choose from what numbers should I look for? According to a Queensland government PDF you should look for an attenuation which results in a resultant “loudness” in the range of between 70 and 85 dB over a typical eight hour workday. In the US one recommendation is to not exceed 85 dB over the same timeframe. These recommendations are based on a typical work day for factory workers/heavy machinery operators/those in known high noise environments. As we saw in part one, 85 dB isn’t particularly loud and these guidelines are predicated on not being around loud sound outside this eight hour window which isn’t often practical.
HOW MUCH IS ENOUGH?
So how much protection do I need? Now that you’re armed with a basic level of knowledge you’ll be able to make that call yourself. For me, knowing the types of longer rides that I enjoy then this means that I’m only interested in class 5 earplugs, NRR 33 and a SLC80 rating of +29 dB.
And what about those different standards? They all measure decibels right? Yes, but in subtly different ways. Take a look at the chart below comparing the results from the ANSI and AS/NZS standards for the same earplugs, there’s a BIG difference in the numbers (the AS/NZS standards are arguably stricter)! Make sure that you’re comparing apples with apples and not grapefruit, because, well, they’d be different wouldn’t they? Standards, love ‘em 🙂

From the above chart you can see that an ANSI standard earplug shows significantly different attenuation characteristics when compared with the same earplug measured according to the AS/NZS standards. If you were looking to buy these plugs online, typically from an America supplier, you’d see them listed as NRR33 which sounds pretty good but per Australian/New Zealand standards these are only a SLC(80) 23dB, class 4 earplug; there’s more protection available!
AFTER CARE
Assuming that you’ve now chosen to wear earplugs, how about maintenance and care? You and/or your mechanic maintain your bike, right? The same applies to your earplugs. Bacteria thrive in warm moist conditions and sticking a moistened piece of foam rolled between none too sterile fingers into your ear is something to watch out for – lots of people wet their plugs with saliva to make insertion easier. Disposable earplugs are typically single use. Yep, that’s right: single use. Sure, they’re not “worn” out after just one use, it’s more about keeping them clean so that you don’t develop an ear infection which could destroy your hearing far more efficiently than a lifetime of riding could. Standard practice is to use them once and once only; your definition of once could be once a day ie a fresh pair for each day that you ride.
You can wash custom moulded and reusables with antibacterial soap and a soft toothbrush, but ensure that they’re completely dry before the next use, you could consider using Listerine on occasion too. It’s also recommended that you don’t wet/lick your reusable plugs before insertion, sure it makes them go in more easily but we have crazy amounts of bacteria in our saliva, 1 ml can contain 100 million microbes!
How about maintaining your ears? Sure you may shower every day and wash your ears with soap but whatever you do don’t stick anything in them, my GP uses the phrase “don’t stick anything smaller than your elbow in there”, sage advice. Cotton buds will push wax further in and may eventually block your ear canal completely and impact your ear drum affecting your hearing and potentially perforate your eardrum. Ear wax though is a good thing; it keeps our ears healthy. Our ears self-cleanse but inserting lumps of silicon or foam over an extended period of time will likely push wax ever deeper into your ear canal making it very difficult to remove. Have your ears been painful using earplugs or sometimes you’ve had trouble getting water out of them? It could be that they’re already blocked. Some audiologists recommend a minimum annual ear check by your doctor to remove any stubborn wax deposits. This is simply done with a syringe and warm water to dislodge any wax, an alternative is to use products like Ear Clear at home.
Continued in Part Three – The Data
Change log:
Clarified that “they [custom moulded earplugs] may offer slightly more hearing protection than ear canal only custom plugs…”
Added “Knowing how much protection you’ll get from a custom plug is very difficult to measure and the plugs will be affected by any weight loss or gain and by jaw movements.”